W3 Total Cashe (W3TC) is a very powerful tool. This WordPress plugin can help you increase you blog’s speed noticeably. As a No 1 tool among other popular tools to increase WP blog’s speed, it requires a better explanation on configuration and settings to achieve the best results.
First thing’s first. Go to Performance menu and click on General Settings.
W3 Total Cashe – General Settings
- Page Cashe – enable this function.
- Minify – enable. This is very important part. We will look into later.
- Database Cashe – disable. ( Do not tick this option)
- Object Cashe – disable.
- Browser Cashe –enable.
- CDN (Content delivery network) – disable. Can be enabled but I will talk about it later.
- Varnish – disable.
- Network performance and security powered by CloudFlare – enable.
Click on the pictures to enlarge them.
-

-
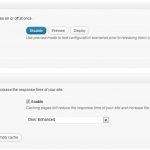
Google Page Speed dashboard widget – enable it. You will find this function in the Miscellaneous tab. When enabled you will get Google page speed results on the WP dashboard. Using this widget is easy to see what has to be modified and improved. The more points you get the better and faster your blog is.
Network performance powered by CloudFlare
Acording to ClaudFlare they can increase website’s speed. I’ve been trying to sign up and configure my account but when I wanted to activate CloudFlare I had to change my Name Servers. I can’t provide you more information on this. If you change your Name Servers CloudFlare will become your new DNS provider. It’s up to you if you want to change your Name Servers.
W3TC – Page Cashe Settings
- Cashe Home Page – enable.
- Cashe feeds – should be enabled as well.
- Do not cashe pages for logged in users – enable it.
- Cashe requests only for [Your] hostname – enable it as well.
Four functions that have to be enabled in the Page Cashe settings tab.
- Cashe 404 pages – disable
- Cashe URls with query string variables – disable
- Cashe SSl requests – disable
The rest of them have to be disabled.
Advanced Page Cashe settings
Do not modify, add or remove anything here. Leave this section untouched.
Page Cashe – Cashe Preload settings
Basically, you can leave this option disabled. But if you want to cash all your pages and posts using sitemap URL – enable it. You can enable it and use the default options. However, to avoid preformance problems it is recomended to change the values. Pages per interval – this option might cause performance problems. Default value is 10 but try using a value of 7.
- Automatically prime the page cache – enable.
- Update interval – 900 (can be higher as well).
- Pages per interval – 7 (default is 10). Increasing the value may cause you performance problems.
When you enable it a PGCASHE folder in yourdomain.com/wpcontent/w3tc/ directory will be empty. I have checked my pgcashe folder in 10 hours and noticed that all posts and pages were cashed.
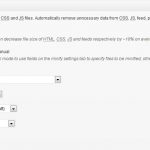
W3TC settings – Minify
Skip HTML and JS settings for now and enable CSS. Scroll down to CSS section. Now everything depends on your theme. When i have changed these settings my theme stopped loading so I had to roll back and change all settings to default. If you have a good coded CSS try using these CSS minify settings:
- Enable – checked
- Combine only – uncecked.
- Preserved comment removal – checked.
- Line break removal – checked.
If you have a good coded CSS you will not have any problems enabling the last two options. However, if your CSS is bad coded you will have to disable them. You can enable preserved comment removal and line break removal then deploy it. After that check if your blog is loading up and theme is showing as usual. If you see no changes you can save these settings.
Advanced Minify settings
Default settings are fine. Values depends on how busy your site is. If you have a busy site you can try using these settings:
- Update external files every – 86400 seconds.
- Garbage collection interval – 86400 secconds.
However, if your site isn’t very busy you can change both values to 216000. You can also use default settings. Lower value is better for busy sites.
General Minify settings
- Rewrite URL structure – checked.
- Disable Minify settings for logged in users – unchecked.
- Minify error notification – it will notify you if any cashe creation error occur. Choose both Admin and email notification.
JS (Java Script) settings
If you don’t have Google adsense adds on your blog you can enable it. I don’t have many JS codes running on my site so I leave it disabled.
HTML and XML settings
- Enable – checked
- Inline CSS minification – enable
- Inline JS minification – enable
- Don’t minify feeds – enable
- Line break removal – enable
These settings will bost your blog’s loading speed. But you need to be cautious. If you have Google adsense adds on your blog disable Inline JS minification and line break removal to avoid violation of Google adsense policy. Any modification of JS script code is not allowed. If you change the code in any way you will get banned from Google Adsense.
Database Cashe settings
Should be disabled. Don’t change anything here.
Object Cashe settings
Same here. Do not touch anything here.
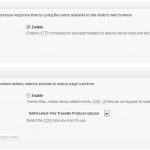
Browser Cashe general settings
- Set expires header – enable
- Set cashe control header – enable
- set etag – disable
- Set W3TC Cashe header – enable
- Gzip compression – enable
- do not proccess 404 errors… – disable
CSS and JS
Do not change anything here.
HTML and XML
Leave it untouched.
Media and other files
Same here. Do not change anything.
Save all settings and check your htaccess file. You will see a lot of codes running but the main code is still untouched.
CDN – Content Delivery Network
If you enable and configure it properly your site will load much faster. If you want to read more on CDN visit maxcdn.com.
All you have to do is save your settings by clicking on deploy. From now your site should run much faster.